Pillows made out of Vintage Fabric

128

        When I came across all kinds of material

in my late Mom’s linen closet, I knew I  had found some treasure.

I always had a soft spot for old  linen material,

be it tablecloths, bed linen, old dishtowels, and such.

120

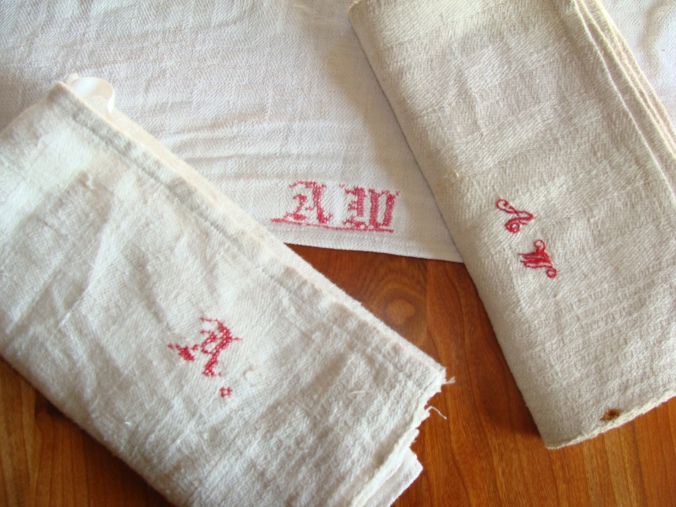
As a young girl I was fascinated by the stack of old grey pure linen dish towels

in my Mom’s closet.

They were never used, hence the grey-ish colour of unwashed linen.

I love the story that my Grandma, had spun all the flax herself, then walked  with her

yarn all the 20 km to a weaving mill. After a certain time Oma Agnes walked the same

distance again, to pick up her precious dish towels and table cloths.

As it was custom in Germany back in the twenties, she cross stitched her initials A.W.

in bright red onto these pieces.

Agnes would have done the same with her bed sheets and duvet covers,

unfortunately none of these survived.

122

                               I never had the chance to meet my maternal Grandma,

she died before my Mom got married. But apart of the mentioned dish towels and table

cloths, I also got her name, Agnes,  as a middle name, which always made me proud…


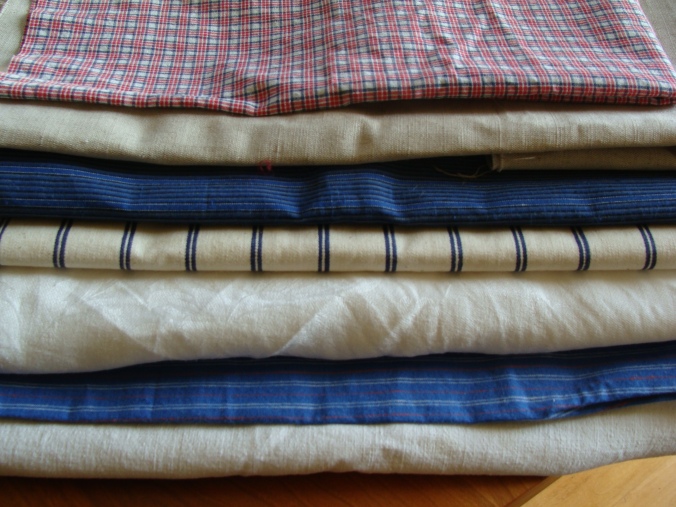
Back to my stack of different material:  At a Easter craft fair last spring, I was

drawn to one table which had especially beautiful pillows on display.

They were made out of stripes from

all kinds of old linen and vintage cotton fabric.

I was motivated to use the bits and pieces of my “pile”

to create something similar beautiful.

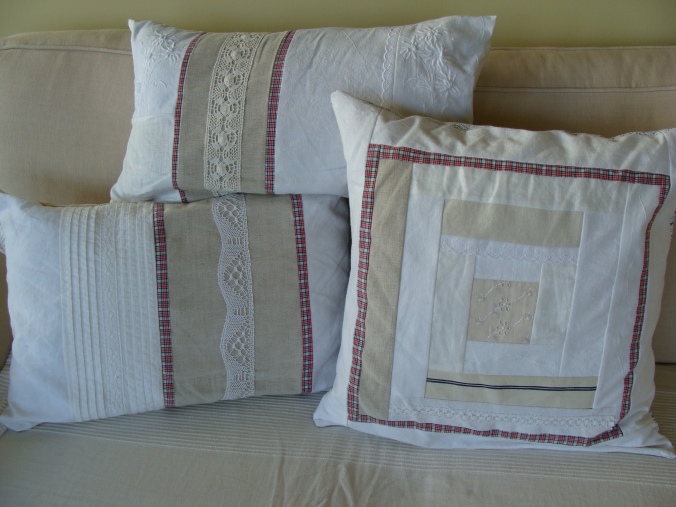
Apart from linen and cotton, I also discovered some pretty laces in my Mom’s

‘sewing drawer’. I was going to use those as well.

125

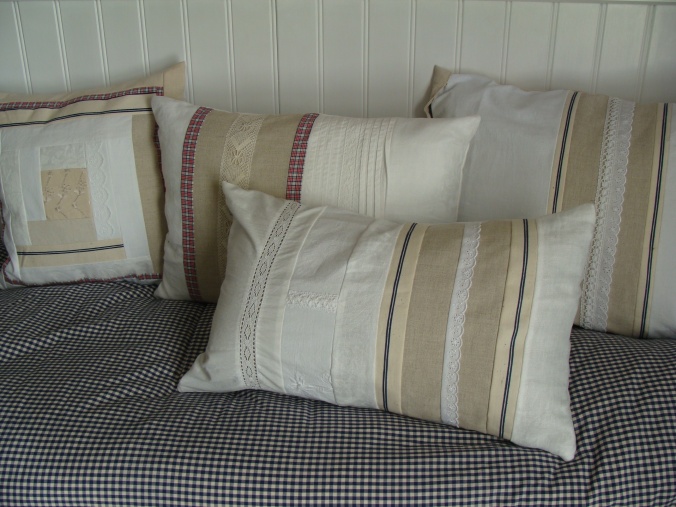
And here is the result.

131

Disclaimer: Because the possibilities in creating unique pillows are endless, this task

could be addictive.

130

I am back with -what else- a new wreath

Herbstkranz und succulenten 2019 109

During a stroll through my garden,

I recognized the rich colors of flowers, leaves and fruits,

as the unambiguously proof of the arrival of fall.

So instead of denying this fact, I decided to celebrate and welcome this new season;

by collecting grapes, mountain ash berries, sunflowers, fall hydrangeas, black berry and

wild clematis leaves, sedums and orach.

And this is the end result.

The next day when I came across some mushrooms,

I added them to the wreath:

Herbstkranz und succulenten 2019 115

Blessed Fall everyone

Harvest Moon and First Fall Deco

082

The full moon closest to the autumnal equinox
(commonly known as the begin of the Northern Fall)
is called the Harvest Moon.
At this time of the year the moon rises at about the same time as the sun sets.
One given explanation for the name Harvest Moon is almost beyond our comprehension.
Long time ago, before the expression: “light pollution”
or more precisely before the very first light bulb,
Farmers depended on the moon light
to bring their harvest in.The light source of the bright Harvest Moon
gave the farmers and workers the opportunity to extend their working hours.
This was probably their busiest time of the year,
when they were able to gather, pick and harvest what they so laboursome had sown, looked after and worried about in the previous months.
The outcome of that harvest would decide how they would survive the next winter and what resources would be left.

083

Inspired by that story, I went for a walk last night and  picked apples from
a wild apple tree near by.
I turned them into a wreath this morning.
The little branches were the apples mostly hang in twos
made it so easy to fix them onto my circle with wire.

Happy Fall everyone !

085

Black Currants

089

Currant bushes are more common in Europe than here in North America.
We grew up watching (and later on helping) our mothers and grandmothers picking the berries, turning them into delicious jam or freezing them for a later use;
hopefully for our all favourite cake: Black Currant Kuchen.

No wonder we bought three bushes a few years ago,
when we discovered them in a nursery close by:
one with black, one with red and one with white berries.
We were curious which one would grow best:
the black currant was announced without any doubt to be the winner.
Not only is the taste more intense,
the black berries are twice the size  of their red and white cousins, and on top of everything else they convince with their nutrition facts.

090

Here is a comparison between blueberries and black currants:

                                100g Blueberries:                                     100g Black Currants:
Vitamin A            2%                                                                     7.5%
Vitamin C            1.5%                                                               301%    (no I did not forget a comma)
Vitamin E             4%                                                                    –
Vitamin K            13%                                                                  –
Calcium                0.5%                                                                 5%
Iron                        3.5%                                                                19.5%
Magnesium          1.5%                                                                 6%
Zinc                        1.5%                                                                  2%
Copper                    –                                                                       9.5%
Manganese            –                                                                     11%
Phosphorus           –                                                                      8.5%

…and the antioxidants: the darker the fruit the higher the antioxidant content.
No surprise that a study in Britain by
Dr Stewart, claims the humble black currant to be the N0 1 superfruit!

086

When I prune my bushes after the harvest in fall, I push the canes directly into the soil. It is surprisinng how easily they grow. By doing this for years, I now have an abundance of black currant bushes and as result plenty of frozen goodness in my freezer!
We love them for breakfast with yoghurt and oats, in smoothies, in homemade ice cream, as sugar reduced jam and of course in the above mentioned Kuchen.

097

Simple Decorations with Driftwood

013

On my last walk on the beach
I collected smaller driftwood pieces to make a sun for the garage door.
This is an easy and fast project.
With a glue gun I secured the pieces on a round wooden disc.

004

At the end I attached some beach glass and shells.

009

Because there were so many driftwood sticks left,
I created another work of art for the garden shed.

Last week I used all kinds of beach finds and stung them on twine, or in the case of the beach glass onto wire. Now they hang from a bigger drift wood piece. Doesn’t this look great on the old cedar shingles on our barn?

006

A Wreath out of Bread Rolls

002

My plan was to bake some bread rolls for my friend’s birthday.
While the dough was resting and rising,
I had the idea to form  the dough into a wreath like looking circle.This was after I braided a wreath out of wildflowers for her as well.
I suppose my mind was in wreath production mood.
While I was able to take two pictures of the bread roll wreath, the battery on my camera died before I could do so with the flower wreath.

When I was at the Bulk Store the other day,
I discovered that they now sell different kinds of sprouted flour. I had read so much about the health benefits of sprouted flour, even considered sprouting some grains myself.
However the lengthy process involved for this method discouraged me.
So, I was pretty excited to find a resource for sprouted flour.

You don’t need to use sprouted flour for this recipe. You can substitute the Rye and Spelt flour with any flour, or only use unbleached  or all purpose flour (1kg)

Recipe:
750 g unbleached flour
150 g sprouted spelt flour
100 g rye flour
3 tsp dry yeast2tsp sea salt
750ml water

Weigh and measure all your ingredients.  Use a small bowl or cup and mix yeast, about 150ml of water and 2 Tbs of flour, stir until all  lumps have dissolved. After 30 min. you should be able to see how the yeast mix is rising. Now combine all the ingredients (add the yeast paste into the bowl with the remaining flour and the salt, pour most of the water in and start kneading your dough. If the bread dough is to dry, add the rest of the water). If  you have a Stand Mixer, it will do the work for you. Otherwise just keep kneading on your working surface until the ball of dough is smooth. Put a tea towel over your bowl and wait at least for one hour. If your dough has doubled in size, you are ready to shape your rolls. Put them on a greased baking sheet and brush them with milk (or water) before you sprinkle sesame or poppy seeds over them. This will make them stick better. Before they go in the oven use a sharp knife to cut each roll.

Bake at 200 C / 400 F  for about 25-30 min.

001

Treasures from the Beach

Every once in a while eight year old Alberta comes for a sleep over.
Usually we spent some time outside,  knit together, play games,
and do some crafts among other things.

009

A while ago I had made a WELCOME sign by gluing beach glass
and tiny appealing pebbles on a driftwood piece.
Alberta had expressed her wish to create such a sign for her family.
We went down to the beach to collect all the material, necessary for the project.
With eyes wide open, we searched the shore, determined not to miss any of the treasure, camouflaged between the rocks.

We got rewarded with pieces of different coloured beach glass, beautiful pebbles and sea shells. In addition we carried an armful of driftwood and sea washed boards to the car.

003

Back at our house, Alberta started with sorting out what she wanted to use for her sign.
With a pencil she wrote the letters on the wooden piece.
We used carpenters glue to attach
the glass – the pebbles – and the shells
to the wood.

008

Every time my little friend spends time here, she wants to make presents for her siblings.
This time it would be a piece of drift wood with their names painted on.

004

The second day of her visit ends with a dinner invitation for her whole family.
We planned a potatoe, cabbage and beef Casserole and apple crisp for dessert.
Although cooking kept us busy all afternoon,
we were able to squeeze in some time for board games!
Dinner was enjoyed by everyone and Alberta’s gifts were happily received.

Alberta’s question at the end of the day:
When can I come again?

006

Tarte Tatin, an upside down apple tart

007

.   Beside the unpretentiousness of the tarte, it will surprise you with bursting flavour and  apples steamed to perfection under the short pastry.

While  the  original French tart uses sugar in the crust and the caramel,
I replaced refined sugar with maple syrup.

Fot the short pastry:
200g unbleached flour
80g unsalted butter
1 egg
1-2 Tbs maple syrup

Mix ingredients knead together and form a ball.

For the caramel:
20g unsalted butter
2 Tbs. maple syrup
30g sliced almonds

Melt butter in a saucepan , add maple syrup,
bring it to a boil and add almonds.
Pour into the baking dish and spread caramel evenly over the bottom.

Take 3-4 apples like Cortland
Rinse, core, peel, and slice apples in eights
Arrange them in a circular pattern over the caramel in the baking pan
(9-10 inches/ about 24cm)
Don’t use a spring form, the juices would escape and burn in the oven.

002

With a rolling pin roll your pastry into a circle, a bit bigger than the diameter of  your dish.
Lay it over the apples and tuck in the overhanging dough.

004

While the oven is preheating to 350F/180C, I place the oven ready dish in the freezer.
In case you are wondering, this is to eliminate the step where you put the dough for 30 min in the fridge before rolling it out.
When the set temperature is reached bake your tarte tatin for 35 min or until it is golden.
Take the pan out, and loosen the sides of the crust with an knife.Place a cake plate on top of the tart and flip it over.

005

Serve warm. It’s delicious on its own, but could be accompanied by ice cream, whipping cream or Greek yoghurt.

Bon appétit

A Knitted Birthday Card & A Poem

014

Perhaps you have seen the post about my knitted linenstitch scarf
and  how I love that its look could be mistaken for being woven.

When the birthday of our daughter was around the corner and I was playing with ideas for her card, the linenstitch theme appeared again.
I  delight when the motive on a card, is not only appealing but points to a deeper meaning, is acting as a symbol.

One needs two different coloured yarns to make the effects of the linenstitch visible.
I opted for a red yarn going from beginning to end.
For the “other” I chose different colours and all kinds of wool types.

013

I hoped this would turn out to become a picture of our lives: dark colours and rougher yarns showing tougher and more challenging times,
while brighter colours and softer wools
would symbolise the delightful days and seasons.
I saw the red yarn as a never changing, always appearent support:
God as the thread of our life’s  story .

This thought reminded me of a poem from Corrie ten Boom.
Here it is:

“Life is but a Weaving” (the Tapestry Poem) by Corrie ten Boom

“My life is but a weaving
Between my God and me.
I cannot choose the colors
He weaveth steadily.

Oft’ times He weaveth sorrow;
And I in foolish pride
Forget He sees the upper
And I the underside.

Not ’til the loom is silent
And the shuttles cease to fly
Will God unroll the canvas
And reveal the reason why.

The dark threads are as needful
In the weaver’s skillful hand
As the threads of gold and silver
In the pattern He has planned

He knows, He loves, He cares;
Nothing this truth can dim.
He gives the very best to those
Who leave the choice to Him.”

Ofenschlupfer or Baked Bread & Apple Pudding

033

Ofenschlupfer means: slip out of the oven

My mama served this dish often when there was too much dry bread in the bread drawer.
Indeed, when I was growing up, many  kitchen tables had one deep drawer and this was the common place for storing bread.

Here is the recipe:

250g baguette or breadrolls (1-2 days old)
4-5 apples
300 ml milk
3-4 eggs
2 tsp. sugar mixed with cinnamon
some crushed almonds or other nuts (optional)
small piece of butter

026

Peel apples and cut into thin slices
Slice the bread
Butter an oven proof dish and start with a layer of bread
followed by apples and nuts. Repeat this step. Your last layer should be bread.
Mix  eggs and milk well and pour evenly over the bread.
Sprinkle cinnamon sugar on top and some
pats of butter.
Preheat oven to 180C/375F and bake for 30-40 min.

The Ofenschlupfer tastes delicious by its own.
But pairing it with vanilla sauce (custard sauce) takes the experience onto a new level.

032

Recipe for Vanilla sauce:

500ml milk
1 egg yolk
half of a vanilla bean (cut in half lengthwise)
20g cornstarch
1-2 tbs sugar

Bring 400ml of milk and the piece of vanilla to a boil.
Mix the remaining 100 ml of milk with the egg yolk, the cornstarch and sugar well.
When the milk is boiling, take your pot off the heat. Take out the vanilla
(careful, don’t burn yourself) and scratch the vanilla goodness back into the pot.
Pour the egg yolk/milk/sugar/cornstarch mix into the hot milk while whisking it constantly. Put the pot back on the hot stove, still stirring until the milk mixture thickens.

As observant readers you most likely realized that my vanilla sauce looks more like a custard and not saucy at all. I was using 30g of cornstarch which proofed to be to much. So I changed the amount to 20g in the recipe, with that the sauce should flow nicely off the Ofenschlupfer.

036

Bon appétit